Welcome to the world of web hosting, where the right choice can make all the difference in the success of your online venture. In this blog post, we will unravel the mysteries of managed and unmanaged web hosting, helping you navigate through the options and make an informed decision that sets your website up for greatness.
Picture this: you have a brilliant idea for a website, a vision that deserves to be seen and appreciated. But without a reliable hosting solution, that vision remains hidden from the world. That’s where managed and unmanaged hosting comes into play.
Managed hosting, like having a team of dedicated professionals by your side, takes care of all the technical aspects, allowing you to focus on what you do best – creating content and engaging with your audience. Unmanaged hosting, on the other hand, gives you the freedom and control to mold your server environment according to your unique needs and expertise.
In this blog post, we’ll shed light on the differences between these two hosting options, equipping you with the practical understanding and insights needed to make a decision that suits your website’s specific requirements. We’ll explore the benefits and considerations of each approach, guiding you through the maze of technical jargon and demystifying the world of hosting.
Our aim is to empower you with the knowledge to make an informed choice. Whether you’re a passionate blogger, an aspiring entrepreneur, or a seasoned business owner, this blog post is your roadmap to finding the hosting solution that aligns perfectly with your goals.
Let’s dive in and unlock the secrets of managed and unmanaged web hosting, paving the way for your website’s success in the digital realm.
II. Understanding Managed Web Hosting:
In this section, we will delve deeper into managed web hosting, breaking it down into simple terms and highlighting its benefits for website owners.
Managed web hosting refers to a hosting service where the provider takes care of the technical aspects of managing your website’s server. They handle tasks such as server maintenance, security updates, and backups, allowing you to focus on your website’s content and growth.
Here’s what makes managed hosting an attractive option for website owners:
The Convenience of Dedicated Support: One of the key advantages of managed hosting is the convenience of having a dedicated support team available 24/7. They are there to assist you with any technical issues promptly, ensuring that your website remains up and running smoothly. Whether you need help with server configurations, software updates, or troubleshooting, their expertise is just a phone call or message away.
Effortless Server Management: Managed hosting saves you valuable time and effort by taking care of server management tasks. The hosting provider handles important responsibilities such as updates to keep your website secure, implementing robust security measures, and performing regular backups to protect your data. This frees you from the complexities of server management, allowing you to focus on creating content and growing your online presence.
“Pro Tip: With managed hosting, you gain a support team that’s like having your own personal IT department. Say goodbye to technical headaches!”
Now, let’s take a closer look at the comparison of managed hosting plans from popular providers:
Features: Provides a fully managed WordPress environment, automated backups, and a staging environment for testing changes.
Support: Offers 24/7 technical support from WordPress experts via live chat and ticket system.
Pricing: Starts at $25 per month, with different plans based on the number of websites and monthly visits.
By comparing the managed hosting plans from these popular providers, you can evaluate the features, support options, and pricing offered. Consider your specific needs, such as the platform you use (e.g., WordPress), expected traffic levels, and budget, to determine which provider aligns best with your goals.
Remember, the right managed hosting plan can provide you with the technical support and peace of mind you need to focus on growing your website and delivering a seamless experience to your audience.
III. Unmanaged Web Hosting Explained:
When it comes to unmanaged web hosting, it’s all about taking the reins and having full control over your server environment. Unlike managed hosting, unmanaged hosting puts you in charge of every aspect of server management and customization. Let’s dive into the practical insights to understand the power of unmanaged hosting.
Here’s what makes Unmanaged hosting an attractive option for website owners:
Empowerment through Control and Flexibility: With unmanaged hosting, you have the freedom to shape your server environment according to your specific needs. From selecting the operating system and software to configuring security settings and resource allocation, you have the ultimate control to create a customized hosting experience. It’s like having a blank canvas where you can paint your own digital masterpiece.
Cost-Saving Potential: Unmanaged hosting can be a cost-effective choice for those who possess the technical expertise to handle server management. By taking on the responsibility yourself, you can bypass the additional costs of a dedicated support team. However, it’s crucial to keep in mind that unmanaged hosting requires a certain level of technical proficiency to effectively handle server tasks and troubleshooting.
“Pro Tip: Unmanaged hosting gives you the freedom to customize your server environment, but be prepared to invest time and expertise into managing it effectively.”
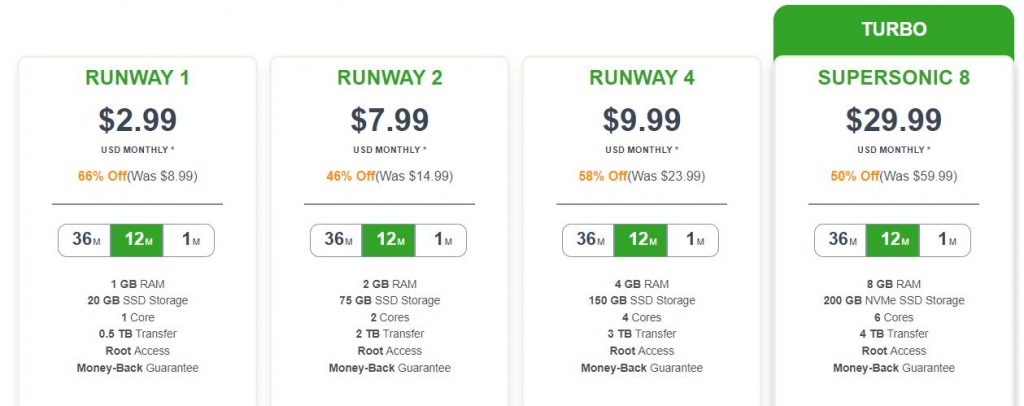
Now, let’s take a closer look at some popular providers of unmanaged hosting and what they offer:
Resources Included: SSD storage, high-performance CPUs, and data transfer.
Server Control Options: Full root access and a customizable firewall.
Pricing (Starting from): $2.50/month.
These providers offer a range of unmanaged hosting plans with varying resource allocations, server control options, and pricing. It’s essential to compare the features and pricing to find the provider that aligns with your requirements and budget.
By understanding the concept of unmanaged hosting, its control and flexibility, and the potential cost savings, you are equipped to make an informed decision. Just remember to evaluate your technical skills and capabilities before opting for unmanaged hosting to ensure you can effectively manage and maintain your server environment.
IV. Key Differences between Managed and Unmanaged Hosting:
When it comes to web hosting, understanding the key differences between managed and unmanaged options is crucial for making an informed decision. Let’s explore the practical insights that will help you navigate these choices and find the perfect fit for your website.
Expert Support and Server Management:
Managed hosting provides access to a dedicated support team available 24/7 to handle technical issues promptly.
Server management tasks, including updates, security, and backups, are taken care of by the hosting provider, saving you time and effort.
Control and Customization:
Unmanaged hosting offers a high level of control and customization, allowing you to tailor your server environment according to your specific needs.
You have the freedom to install software, configure settings, and optimize performance based on your requirements.
Pricing, Scalability, and Ease of Use:
Managed hosting typically comes at a higher price point due to the added support and services provided.
Unmanaged hosting is often more cost-effective, making it a favorable choice for those with technical expertise.
Managed hosting offers seamless scalability, allowing your website to grow effortlessly.
Unmanaged hosting may require more manual adjustments for scalability.
Managed hosting tends to be more user-friendly and suitable for beginners, while unmanaged hosting requires a higher level of technical proficiency.
“Pro Tip: Managed hosting offers peace of mind and expert support, while unmanaged hosting grants you full control. Consider your needs and skill level when deciding.”
Understanding these key differences between managed and unmanaged hosting will help you make an informed decision based on your specific needs, budget, and technical capabilities. Consider your requirements for support, customization, scalability, and ease of use to determine which option aligns best with your goals and aspirations.
V. Choosing the Right Hosting Option:
When it comes to selecting the right hosting option for your website, it’s essential to consider a few key factors that will help you make an informed decision. In this section, we’ll explore the practical aspects of choosing between managed and unmanaged hosting, taking into account your technical skills, time, and resources, as well as your scalability and growth needs.
Consider the following factors when deciding between managed and unmanaged hosting:
Technical Skills: Start by evaluating your comfort level with server management tasks. If you have little to no experience or prefer to focus on other aspects of your website, managed hosting might be the ideal choice. With managed hosting, a dedicated team of experts will handle all the technical aspects, from server setup to security and maintenance. On the other hand, if you have the necessary technical skills or a team of experts at your disposal, unmanaged hosting provides the freedom and control to customize your server environment according to your specific needs.
Time and Resources: Assess the availability of your team or yourself to manage and maintain the server infrastructure effectively. Managed hosting takes the burden off your shoulders by offering round-the-clock support and handling routine tasks such as updates, backups, and security. This allows you to focus on other critical aspects of your website, such as content creation and marketing. However, if you have the time, resources, and technical expertise to manage your server environment, unmanaged hosting can provide a more hands-on approach and complete control over your hosting environment.
Scalability and Growth: Consider your website’s future needs and growth potential. Managed hosting is designed to scale your website, offering flexible resources and advanced features to accommodate increasing traffic and demands. It provides a reliable infrastructure and support system that can handle rapid growth without compromising performance. Conversely, if you have a smaller website with predictable traffic patterns and don’t foresee significant growth, unmanaged hosting can be a cost-effective option. It allows you to tailor your server environment precisely to your current needs, avoiding unnecessary expenses.
“Pro Tip: Evaluate your technical skills, time availability, and growth plans. Managed hosting provides convenience, while unmanaged hosting requires technical proficiency.”
By carefully considering these factors, you can make a well-informed decision that aligns with your specific requirements and goals. Remember, it’s crucial to find the right balance between your technical capabilities, available resources, scalability needs, and growth aspirations.
Conclusion:
Choosing the right web hosting option is crucial for the success of your website. Throughout this blog post, we have explored the differences between managed and unmanaged hosting, providing practical understanding and insights to help you make an informed choice.
Managed hosting offers convenience with a dedicated support team handling server management tasks, while unmanaged hosting provides control and customization options for technically inclined users. Consider your technical skills, time availability, scalability needs, and growth aspirations when making your decision.
To aid your decision-making process, we provided a comparison of managed and unmanaged hosting plans from reputable providers. Explore their features, support, scalability, and pricing to find the best fit for your website.
By choosing the right hosting option, you can ensure a reliable and efficient hosting environment that supports your website’s growth. Whether you opt for managed hosting or unmanaged hosting, the decision should align with your unique needs and goals.
We hope this blog post has provided you with practical understanding and insights. Take the time to evaluate your options and select a hosting solution that sets your website up for success.
Good luck with your hosting journey, and may your website thrive in the digital realm!
Have you ever experienced the frustration of a slow-loading website or encountered an error message that prevents you from accessing a site? These issues can cause a major headache for visitors and can ultimately lead to a decline in traffic and conversions.
Website migration is the process of moving a website from one hosting provider to another, and it can be a complex and daunting task. However, it’s an essential step in maintaining a high-performing website and keeping up with changing technology and business needs.
In fact, a recent study by Google found that website speed directly impacts user satisfaction and can have a significant impact on bounce rates. Additionally, websites that load quickly tend to have higher search engine rankings, which can lead to more organic traffic and ultimately, more revenue.
But website migration isn’t just about improving website speed and performance. It can also be a strategic business decision, such as when a company merges with another or rebrands. In these cases, it’s important to ensure a seamless transition to avoid losing customers and damaging the brand’s reputation.
So, what are the steps involved in website migration? It can vary depending on the complexity and size of the website but generally involves choosing a new hosting provider, checking for compatibility issues, choosing a migration method, backing up website files and exporting the website’s database, creating a new database on the new hosting account, uploading website files to the new hosting account, importing the database to the new hosting account, updating the website’s configuration file, minimizing downtime, testing the website thoroughly, updating DNS records, and making final tweaks to ensure a successful migration.
It may seem like a lot to handle, but by following a clear and organized process, website migration can be accomplished smoothly and efficiently. In the following sections, we’ll dive into each step in detail to help guide you through the process.
Choosing a New Hosting Provider
When it comes to choosing a new hosting provider, there are a few factors to consider that will help ensure a smooth website migration. Here are some important things to keep in mind:
A. Factors to Consider:
Price: Hosting costs can vary widely depending on the provider and the plan you choose. Make sure to compare prices and understand what is included in each plan.
Features: Different hosting providers offer different features, so it’s important to think about what your website needs. Do you need a lot of storage space? Do you need support for a specific programming language? Do you need a website builder or email hosting? Make a list of your requirements and find a provider that meets them.
Customer support: If you’re new to website migration, or if you run into any issues during the process, you’ll want to have access to helpful and responsive customer support. Look for a provider with 24/7 support, multiple channels of communication (e.g. phone, chat, email), and a good reputation for solving customer problems.
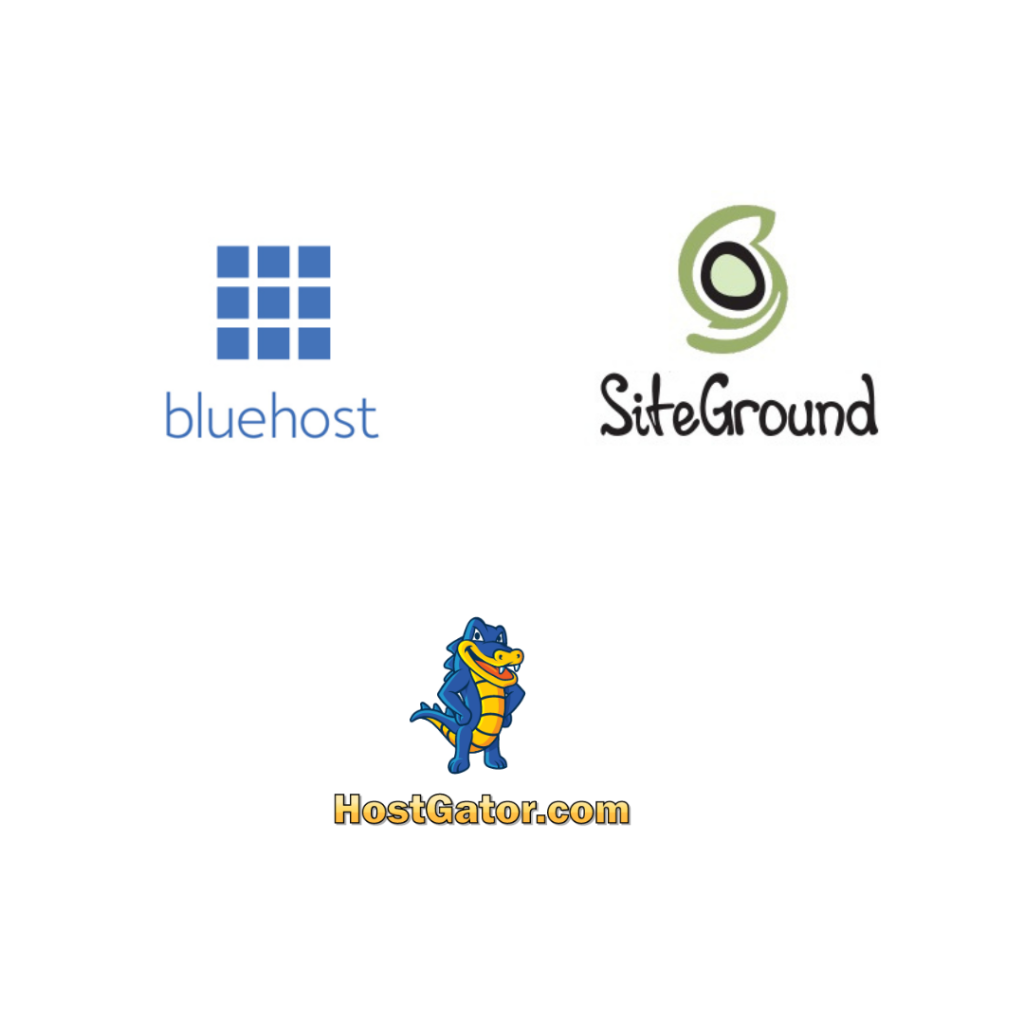
B. Popular Hosting Providers:
There are many hosting providers to choose from, but here are three of the most popular:
Bluehost: Bluehost is a reliable and affordable option that offers a variety of hosting plans to fit different needs. They have a user-friendly interface, 24/7 customer support, and a free domain name for the first year.
SiteGround: SiteGround is known for its fast and secure hosting, with features like daily backups, free SSL certificates, and an easy-to-use control panel. They also have excellent customer support, with a reputation for quick response times and helpful solutions.
HostGator: HostGator is another popular option that offers a range of hosting plans for different budgets and needs. They have a simple control panel, 24/7 support, and a 45-day money-back guarantee.
According to a recent survey by Hosting Tribunal, 61% of website owners have switched hosting providers at least once, with the top reasons being slow loading times, poor customer support, and unexpected downtime. Choosing the right hosting provider is key to avoiding these issues and ensuring a successful website migration.
Check for Compatibility Issues
As you prepare for your website migration, one crucial aspect you must not overlook is compatibility issues. Compatibility issues occur when your current website software and applications are not compatible with your new hosting provider, leading to performance issues, downtime, or even data loss. To prevent this from happening, it is essential to check for compatibility issues before migration.
A. Here are some steps to check for compatibility issues:
Identify the software and applications used on the website: Make a list of all the software and applications used on your website, including the content management system, plugins, themes, and any other third-party software.
Check the new hosting provider’s compatibility with the software and applications: Research and compare the new hosting provider’s compatibility with the software and applications used on your website. Ensure that the hosting provider supports the software and applications and that the versions are up-to-date.
Troubleshooting compatibility issues: If you identify any compatibility issues, you may need to troubleshoot them before migrating your website. Seek technical support from your current hosting provider or the new hosting provider to fix the issues.
Statistics show that compatibility issues are a common cause of website migration failures. Therefore, it is crucial to check for compatibility issues and ensure that your new hosting provider supports the software and applications used on your website. By doing so, you can avoid unnecessary downtime and data loss, making your website migration process smoother and hassle-free.
Choose a Migration Method
Migrating a website to a new hosting provider can be a complex process, and choosing the right migration method is crucial to ensure a smooth transition. In this section, we’ll explore the different migration methods and help you determine which one is best for your website.
A. Explanation of Migration Methods
Before we dive into the steps to choose a migration method, let’s first discuss what migration methods are available. The three most popular methods are:
Migration plugin: This method involves using a plugin to export your website’s content and then importing it into your new hosting provider. It’s a straightforward method and suitable for small to medium-sized websites.
Backup and restore method: This method involves manually backing up your website’s files and database and then restoring them to your new hosting provider. It’s more time-consuming but offers more control over the migration process.
Hiring a professional: This method involves hiring a professional to handle the migration process for you. It’s the most expensive method but provides peace of mind knowing that the migration is being handled by an expert.
B. Steps to Choose a Migration Method
Now that we’ve covered the different migration methods, let’s explore the steps to choose the right one for your website.
Evaluate your level of expertise: If you’re familiar with WordPress and have experience with website migrations, you may feel comfortable using a migration plugin or the backup and restore method. However, if you’re new to website migrations or unsure of your abilities, it’s best to consider hiring a professional.
Evaluate the complexity of your website: If your website is simple with few customizations, a migration plugin or backup and restore method may be suitable. However, if your website is complex with custom code or a unique setup, it’s best to hire a professional.
Evaluate the size of your website: The size of your website can impact the migration method you choose. If your website is small, a migration plugin or backup and restore method may be suitable. However, if your website is large with a lot of data, a professional may be needed.
Evaluate your budget: Migration plugins and backup and restore methods are generally less expensive than hiring a professional. Consider your budget when choosing a migration method.
C. Comparison of Popular Migration Methods
Let’s take a closer look at the pros and cons of each migration method.
Migration plugin: Pros – easy to use, less expensive. Cons – limited customization options, may not work for complex websites.
Backup and restore method: Pros – more control over the migration process, suitable for complex websites. Cons – time-consuming, requires technical knowledge.
Hiring a professional: Pros – peace of mind, handled by an expert. Cons – a most expensive option.
By evaluating your level of expertise, the complexity and size of your website, and your budget, you can determine which migration method is best for you. Whatever method you choose, be sure to follow the proper steps and make backups to avoid any potential issues during the migration process.
Free version available, premium version starts at $42/year
Backing up Website Files
When it comes to website migration, backing up your website files is one of the most crucial steps. This ensures that in case something goes wrong during the migration process, you can easily revert back to the previous version of your website without any data loss.
A. Here is a step-by-step guide on how to back up your website files:
Using cPanel:
Log in to your cPanel account and navigate to the “Files” section.
Click on “Backup” and select “Download a Full Website Backup”.
Choose “Home Directory” as the backup destination and enter your email address.
Click “Generate Backup” and wait for the backup to complete.
Once the backup is complete, you will receive an email with a download link.
Using FTP:
Download and install an FTP client like FileZilla.
Connect to your website using your FTP login credentials.
Navigate to the directory where your website files are stored.
Select all files and folders, and right-click to choose “Download”.
Wait for the download to complete.
It’s important to note that FTP may require some technical expertise, so it’s recommended that you seek assistance if you’re not familiar with the process.
B. Here are the commands for backing up website files using FTP:
Open your FTP client and connect to your website.
Use the command “cd public_html” to navigate to the directory where your website files are stored.
Use the command “lcd /local/directory/” to navigate to the local directory where you want to save the backup.
Use the command “mirror –reverse” to download all files and directories from the website to the local directory.
Wait for the download to complete.
Remember, backing up your website files is a crucial step in website migration. Don’t skip it!
Backup Method
Advantages
Disadvantages
Ease of Use
Storage Capacity
Security
cPanel
Easy to use, automatic scheduling, reliable
Limited storage capacity, can be slow for large websites
Easy
Limited (depending on hosting plan)
Secure if proper authentication is in place
FTP
Unlimited storage capacity can choose specific files to backup
Requires technical expertise, can be slow for large websites
Moderate
Unlimited (depending on available storage)
Less secure than other methods if credentials are compromised
When it comes to migrating your website to a new hosting provider, exporting the website’s database is a critical step. The database contains all of your website’s content, including blog posts, pages, comments, and settings. Therefore, it’s important to back up your database before making any changes to your website. In this section, we’ll discuss the importance of exporting your website’s database and provide a step-by-step guide on how to do it.
A. Why Exporting the Website’s Database is Important?
Exporting your website’s database before migrating to a new host ensures that you don’t lose any important data during the transfer. If anything goes wrong during the migration, having a backup of your database will allow you to restore your website to its previous state. Moreover, it also helps you to migrate the website quickly and efficiently without any hiccups.
B. Step-by-Step Guide to Export the Database
There are different methods to export the website’s database, but we’ll be discussing two popular ones – phpMyAdmin and Command Line.
Exporting Database using phpMyAdmin:
Login to your cPanel account and navigate to phpMyAdmin.
Select the database you want to export.
Click on the “Export” button from the top menu.
Choose the Quick export method.
Select the format for your export. It is recommended to use the SQL format.
Click on “Go” to start the export process.
Save the file on your computer.
2. Exporting Database using Command Line:
Open the command line interface (CLI) on your computer.
Navigate to the directory where you want to save the database export.
Exporting your website’s database is a crucial step in the migration process. It ensures that your website data remains intact and can be restored if anything goes wrong during the migration. We hope this guide helps you export your website’s database easily and efficiently.
No additional tools are needed, user-friendly interface
Limited to smaller databases, potential security risks
Easy
Slow for large databases
Compatible with MySQL
Command Line
Fast, can handle large databases
Requires technical knowledge, the potential for errors
Difficult for beginners
Fast for large databases
Compatible with various database types
Backup Plugins
Easy to use, can automate the backup process
Limited to specific plugins and platforms, potential for errors
Easy
Varies based on the plugin and database size
Compatible with specific plugins and platforms
Creating a New Database on the New Hosting Account
After backing up your website files and exporting your website’s database, the next step in the website migration process is to create a new database on your new hosting account. This is an essential step as your website cannot function without a database, which stores all your website’s data, including posts, pages, comments, and settings.
A. Here is a step-by-step guide on how to create a new database on your new hosting account:
Log in to your new hosting account’s cPanel dashboard.
Navigate to the “Databases” section and click on the “MySQL Databases” icon.
Under the “Create a New Database” section, enter a name for your new database. Make sure to choose a name that is easy to remember, but also unique enough to avoid conflicts with other databases on your hosting account.
Click on the “Create Database” button to create your new database.
You will now see a confirmation message that your new database has been created successfully.
B. If you prefer to use the command line to create a new database, here are commands:
Log in to your hosting account via SSH.
Type the following command to create a new database:
mysql -u username -p -e "CREATE DATABASE databasename"
Replace “username” with your MySQL username and “databasename” with the name of your new database.
Press Enter and then enter your MySQL password when prompted.
You will now see a confirmation message that your new database has been created successfully.
It is important to note that creating a new database is just the first step. You will also need to create a new database user and grant appropriate privileges to the user. This is necessary to ensure that your website can access the database and function properly. Your hosting provider’s support team should be able to assist you with this step if you are not sure how to do it yourself.
Creating a new database is an important step in the website migration process. Following the above steps or commands will ensure that you have a functioning database on your new hosting account.
Command Line Tool
Example Command
Explanation
MySQL
mysql -u root -p <br> create database mydb;
This command logs in to MySQL as the root user and creates a new database named mydb.
PostgreSQL
sudo -u postgres createdb mydb
This command creates a new database named mydb using the PostgreSQL createdb utility. The sudo -u postgres part specifies the user to run the command as.
MongoDB
mongo <br> use mydb
The first command starts the MongoDB shell, while the second command creates a new database named mydb or switches to it if it already exists.
Note that the commands shown above may need to be modified based on the specific setup of your system and database. It is always a good idea to consult the documentation for your particular database management system for more detailed instructions.
Uploading Website Files to the New Hosting Account
Once you have backed up your website files and exported the database, it’s time to upload everything to your new hosting account. This process can seem daunting, but with the right tools and guidance, it can be straightforward.
In this section, we’ll provide you with a step-by-step guide on how to upload your website files to your new hosting account. We’ll also cover some important tips to keep in mind during the process.
A. Importance of uploading website files to the new hosting account
Uploading your website files to the new hosting account is a critical step in the migration process. Without the files, your website won’t be visible to the public, and all the hard work you put into building your site will be for naught.
B. Step-by-step guide on how to upload website files to the new hosting account
The following steps will guide you through the process of uploading your website files to your new hosting account using cPanel and FTP:
Using cPanel:
Log in to your cPanel account on your new hosting account.
Navigate to the “File Manager” section.
Click on the “public_html” folder to access it.
Click on the “Upload” button.
Select the website files you want to upload and click “Open”.
Wait for the upload to complete, and then verify that the files have been uploaded successfully.
2. Using FTP:
Download an FTP client such as FileZilla or Cyberduck.
Connect to your new hosting account using the FTP client.
Navigate to the “public_html” folder.
Drag and drop the website files from your local computer to the “public_html” folder on the remote server.
Wait for the upload to complete, and then verify that the files have been uploaded successfully.
C. Commands for uploading website files using FTP
Here are some example commands you can use to upload website files using FTP:
Connect to the remote server using the FTP client: ftp mydomain.com
Enter your FTP username and password when prompted: Name: myusername Password: mypassword
Navigate to the “public_html” folder on the remote server: cd public_html
Upload a single file: put index.html
Upload multiple files: mput *.html
It’s important to note that the commands may vary depending on the FTP client you are using and the hosting provider you have chosen.
Uploading website files to the new hosting account is a crucial step in the website migration process. By following the steps outlined in this section, you can ensure that your website files are successfully transferred to your new hosting account. Remember to double-check that everything has been uploaded correctly before moving on to the next step.
Importing the Database to the New Hosting Account
Moving a website to a new hosting provider can be an exciting opportunity, but it can also be a daunting task. One important step in the migration process is to import the website’s database to the new hosting account. In this section, we’ll cover the importance of this step and provide a step-by-step guide on how to do it.
A. Why is it important to import the website’s database?
The website’s database contains all of the website’s data, including posts, pages, user accounts, and more. Without importing the database to the new hosting account, the website will not function properly. Therefore, it’s important to ensure that the database is successfully imported to the new hosting account.
B. Step-by-step guide on how to import the database
There are different ways to import a database, but the most common ones are using phpMyAdmin or command line. Here’s a step-by-step guide on how to import a database using phpMyAdmin:
Log in to the new hosting account’s cPanel.
Scroll down to the Databases section and click on phpMyAdmin.
Select the database you want to import from the list on the left-hand side.
Click on the Import tab on the top menu.
Click on the Choose File button and select the database file you want to import.
Ensure that the file type is set to SQL.
Click on the Go button to start the import process.
Wait for the import process to finish. This may take some time depending on the size of the database.
C. Commands for importing the database using command line
If you prefer to use command line tools, you can use the following commands to import the database:
Log in to the server using SSH.
Navigate to the folder where the database file is stored.
Use the following command to import the database:
mysql -u [username] -p [database_name] < [database_file.sql]
Replace [username] with your MySQL username, [database_name] with the name of the database you want to import to, and [database_file.sql] with the name of the database file you want to import.
Enter your MySQL password when prompted.
Wait for the import process to finish.
Importing the website’s database to the new hosting account can be a crucial step in ensuring that the website functions properly after the migration. By following these steps, you can ensure that the process is done correctly and smoothly.
Common import errors and their solutions
Error
Solution
Syntax error
Check the syntax of the SQL file and correct any errors.
Missing tables
Ensure that all necessary tables are included in the SQL file or backup. If not, create the missing tables manually or import them separately.
Collation mismatch
Ensure that the collation of the imported database matches the collation of the original database.
Maximum execution time exceeded
Increase the maximum execution time in the php.ini file or contact your hosting provider for assistance.
Insufficient privileges
Ensure that the database user has sufficient privileges to import the database.
Large file size
Split the SQL file into smaller parts or use a backup plugin that supports large file sizes.
Server timeout
Increase the server timeout in the php.ini file or contact your hosting provider for assistance.
Command Line Tool
Command
Explanation
MySQL
mysql -u [username] -p [database_name] < [database_dump_file.sql]
This command imports a database dump file named [database_dump_file.sql] into the database with the name [database_name]. The -u option specifies the username to use for the import, and the -p option prompts for the password.
This command imports a database dump file named [database_dump_file.sql] into the database with the name [database_name]. The -U option specifies the username to use for the import. The -d option specifies the database to connect to, and the -f option specifies the file to import.
This command imports a MongoDB dump located at [path/to/dump] into the specified database. The --host option specifies the MongoDB server host, the --port option specifies the port to connect to, and the --username and --password options specify the credentials for authentication.
Note: The commands provided are just examples and may need to be modified based on your specific database and server configurations.
Updating the Website’s Configuration File
Your website’s configuration file is a crucial component of its setup. It contains information about the database and other essential settings that the website uses to function correctly. After migrating your website to a new hosting provider, you’ll need to update this configuration file to reflect the new database information.
In this section, we’ll provide you with a step-by-step guide on how to update the configuration file and ensure your website is up and running on the new hosting account.
A. Explanation of the website’s configuration file:
The configuration file is a file that contains information specific to your website’s setup. For example, in WordPress, the configuration file is called wp-config.php and contains essential details such as database name, username, and password, among others.
B. Step-by-step guide on how to update the configuration file with the new database information:
First, log in to your hosting account’s file manager or connect to your website’s server via FTP.
Locate the configuration file for your website (e.g., wp-config.php for WordPress).
Make a copy of the configuration file and save it to your computer as a backup before making any changes.
Open the original configuration file using a text editor such as Notepad or Sublime Text.
Locate the database settings section in the configuration file.
Update the database name, username, and password with the new information provided by your new hosting provider.
Save the changes to the configuration file and close the text editor.
Upload the updated configuration file to the appropriate location on your website’s server.
C. Commands for updating the configuration file using command line:
Command Line Tool Command Explanation Linux sed command sed -i ‘s/old_string/new_string/g’ wp-config.php This command uses the Linux sed command to replace the old database information with the new information in the wp-config.php file. Replace “old_string” with the old database information and “new_string” with the new database information.
Note: The commands provided are just examples and may need to be modified based on your specific website and server configurations.
Updating the website’s configuration file is an essential step in migrating your website to a new hosting provider. By following the steps above, you can ensure that your website is up and running smoothly on your new hosting account.
Minimize Downtime
A. Explanation of downtime and its impact on website traffic
Downtime is the period during which a website or web application is unavailable to users. It can occur due to a variety of reasons, including server maintenance, software updates, and website migration. Downtime can have a significant impact on website traffic and can result in lost revenue, decreased customer satisfaction, and even damage to brand reputation.
B. Steps to minimize downtime:
Schedule the migration during a low-traffic period: To minimize the impact of downtime on website traffic, it’s important to schedule the migration during a low-traffic period. This can be determined by analyzing website traffic patterns and identifying periods of low activity.
Inform visitors in advance of any expected downtime: It’s important to inform visitors in advance of any expected downtime, as this can help manage their expectations and reduce frustration. This can be done through a variety of channels, such as email, social media, and website notifications.
Put up a maintenance page during downtime: During downtime, it’s a good practice to put up a maintenance page that informs visitors that the website is temporarily unavailable. This can help reduce confusion and ensure that visitors understand that the downtime is planned and necessary.
Monitor the website after migration: After the migration is complete, it’s important to monitor the website to ensure that everything is functioning properly. This can involve testing website functionality, monitoring website performance metrics, and addressing any issues that arise in a timely manner.
By following these steps, website owners can minimize the impact of downtime on website traffic and ensure a smooth website migration process.
Test the Website Thoroughly
When it comes to website migration, testing is one of the most important steps. Testing the website thoroughly ensures that everything is working as expected before making the website live. This step can help to prevent any potential issues that could arise after the migration.
Testing the website involves checking all of the pages, forms, and functionalities of the website. This ensures that everything is working correctly and that there are no broken links or missing content. Testing the website is also essential to ensure that the website is responsive and works well across different devices, such as desktops, laptops, tablets, and mobile phones.
B. To help you test the website thoroughly, here are some steps to follow:
Test all the pages of the website: This involves going through every page of the website and checking for any broken links, missing images or videos, or other issues.
Test all the forms of the website: This includes testing all the contact forms, registration forms, and any other forms on the website. Check that all the form fields are working correctly and that any data submitted is being saved properly.
Test all the functionalities of the website: This includes testing any interactive features of the website, such as sliders, pop-ups, or videos. Ensure that all the functionalities are working correctly and that they are responsive on different devices.
Troubleshooting common issues: While testing the website, it’s essential to keep an eye out for common issues, such as slow page load times or broken links. Troubleshooting these issues can help to ensure that the website is working correctly and that visitors have a positive user experience.
Testing the website thoroughly can help to ensure that there are no issues or bugs after the migration. It’s recommended to perform the testing on a staging environment to avoid any negative impact on the live website. Once you have completed testing and are satisfied with the results, you can make the website live.
Remember, testing the website is a critical step in website migration. It can help to ensure that the website is working correctly and that visitors have a positive experience. Don’t rush this step, and take the time to test everything thoroughly.
C. Post-Migration Website Checklist
Item to Check
Description
Website functionality
Test all website functionalities including navigation, forms, links, and media files.
Website speed
Check the website speed using tools like Google PageSpeed Insights or GTmetrix to ensure that the website is loading quickly.
Broken links
Use a link checker tool to verify that all the links on the website are working properly.
DNS propagation
Check if DNS has propagated successfully to ensure that visitors can access the website from the new host.
SSL certificate
Verify that the SSL certificate is installed and working correctly.
Email functionality
Test email functionality, including sending and receiving emails.
Backup configuration
Verify that the website’s backup configuration is working correctly and schedule regular backups.
Security measures
Review the security measures in place, such as firewalls, malware scanners, and two-factor authentication, to ensure that the website is secure.
Analytics and tracking
Check that the website’s analytics and tracking codes are installed and functioning correctly.
Contact forms and lead generation
Test all contact forms and lead generation forms to ensure that they are working correctly and capturing data.
Update DNS Records
As you complete the migration process to a new hosting provider, updating DNS records is a crucial step. DNS, or Domain Name System, is responsible for translating domain names into IP addresses. In simpler terms, it’s like a phonebook that helps users find websites on the internet.
When updating DNS records, you need to make sure that your domain name is pointing to the correct IP address of the new hosting provider. If this is not done correctly, visitors may end up on the old website, which defeats the purpose of the migration.
A. To update DNS records, follow these steps:
Obtain the DNS records from the old hosting provider: Before you can update your DNS records, you need to obtain them from the old hosting provider. These records will include the DNS settings for your domain name.
Update the DNS records to point to the new hosting provider: Once you have obtained the DNS records, you can update them to point to the new hosting provider. This process involves replacing the old IP address with the new IP address provided by the new hosting provider.
Troubleshooting common issues: After updating the DNS records, it may take up to 48 hours for the changes to propagate across the internet. During this time, visitors may still be directed to the old website. You can use tools like DNS Checker to ensure that the DNS records have been updated correctly.
It’s important to note that DNS updates can be complex and may vary depending on your hosting provider. Some hosting providers may have different settings or configurations, so it’s always best to consult their documentation or support team for assistance.
According to a survey conducted by Gartner, the average cost of IT downtime is $5,600 per minute. This underscores the importance of minimizing downtime during website migration and ensuring that DNS records are updated correctly.
By following these steps and updating your DNS records correctly, you can minimize the risk of downtime and ensure that your website is accessible to visitors on the new hosting provider.
Final Steps
Congratulations! You’ve made it to the final steps of your website migration. At this point, you should have successfully migrated your website to a new hosting account, but there are a few more things you need to do to ensure a smooth transition.
A. Tips for Making the Switch to the New Hosting Account
One important step in making the switch to the new hosting account is to redirect your URLs. This is important because any links to your website that were created before the migration will no longer work. You can use a plugin or a .htaccess file to set up 301 redirects, which will automatically redirect visitors to the new URL.
B. Checklist for Ensuring a Successful Website Migration
To ensure that your website migration is successful, it’s important to double-check everything before you launch your new site. Here’s a checklist of items to review:
Check that all pages, images, and other content have been properly transferred to the new hosting account.
Test all forms, links, and other functionalities of the website to ensure they are working correctly.
Update your DNS records to point to the new hosting provider.
Verify that your SSL certificate is properly installed and working.
Check that your website speed is not affected by the migration.
C. Troubleshooting Common Issues During Website Migration
Even with careful planning and execution, website migration can sometimes encounter issues. Here are some common issues that may occur and troubleshooting steps to take:
Error establishing a database connection: Check the database details in the website’s configuration file and ensure they are correct.
Missing files or broken links: Double-check that all files have been transferred correctly and that all links are working.
Slow website speed: Check that your website is not being slowed down by unnecessary plugins or large images.
By following these final steps, you can ensure a successful and seamless website migration. Remember, website migration can be a complex process, but with careful planning and execution, you can make the switch to a new hosting account without any significant issues.
Conclusion
Congratulations! You have made it to the end of this guide on website migration. By now, you should have a good understanding of the steps involved in moving your website to a new hosting provider. Let’s take a quick recap of the steps involved in website migration.
Firstly, it is crucial to take backups of your website and database before starting the migration process. This ensures that your website data is secure in case of any unforeseen circumstances.
Next, you need to set up the new hosting account and migrate your website files and database. This can be done using various methods such as FTP, SSH, and cPanel.
After migrating the website, you need to update the website’s configuration file and DNS records to point to the new hosting provider. Testing the website thoroughly and minimizing downtime are also crucial steps to ensure a smooth migration process.
Lastly, after completing all the necessary steps, it is essential to make sure that everything is working as intended. This can be done by following a checklist for ensuring a successful website migration.
Website migration can be a complex process, but by following the steps outlined in this guide, you can ensure a smooth transition to your new hosting provider. Remember to take backups, test thoroughly, and seek professional help if needed.
In conclusion, website migration can be a daunting task, but it is essential for businesses to keep their online presence up-to-date and secure. By taking the necessary precautions and following the steps outlined in this guide, you can successfully migrate your website to a new hosting provider. We hope this guide has been helpful, and we wish you the best of luck in your website migration journey!
Welcome to our blog post on web hosting problems! If you’re running a website or an online business, you’ve likely encountered some issues with your web hosting service. In fact, web hosting problems are a common challenge that many website owners face.
It’s crucial to address these problems because they can have a significant impact on your website’s performance and even affect your business’s bottom line. Slow website loading speeds, website downtime, poor security, insufficient bandwidth, outdated software, inadequate storage space, poor technical support, email problems, compatibility issues, and more can all cause frustration for website owners and users alike.
To help you tackle these issues and get your website back on track, we’re going to dive into the 10 most common web hosting problems and provide solutions for each. Our solutions are based on technical details and real-life examples of these issues being solved. We’ll also provide troubleshooting checklists to help you diagnose and address these problems quickly and efficiently.
But why are we focusing on these 10 problems specifically? Well, let’s take a look at some data. A survey conducted by Statista found that 44% of internet users will abandon a website if it takes more than 3 seconds to load. That’s a significant number of potential customers lost due to slow loading speeds. In another survey, 71% of respondents said that they would not return to a website if it had poor load time or performance issues. These statistics highlight the importance of addressing web hosting problems promptly to avoid losing traffic and potential revenue.
In summary, we’ll be discussing the 10 most common web hosting problems and solutions to address them. These problems are critical to address as they can significantly impact website performance and user experience. With our technical solutions and real-life examples, we’ll help you troubleshoot and fix these issues quickly and efficiently.
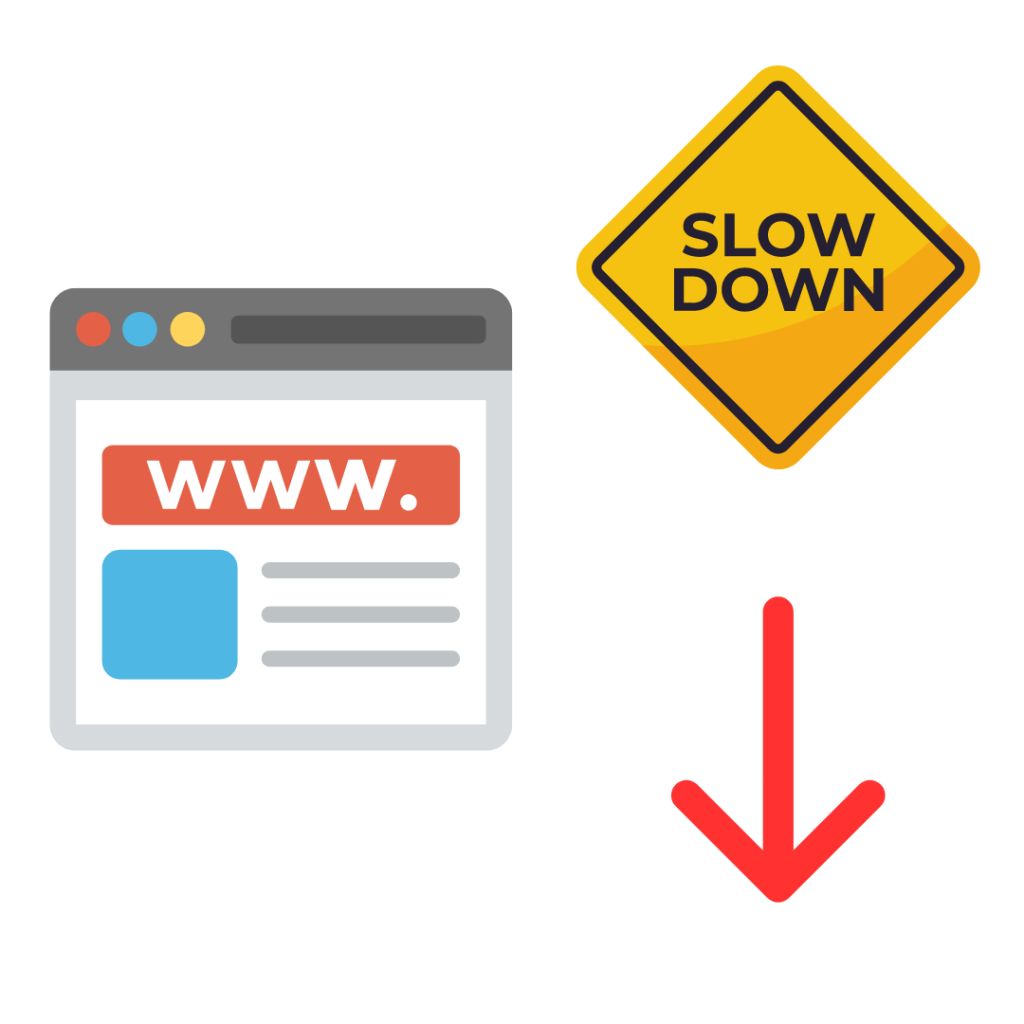
1. Slow Website Loading Speed
A. Why is Slow Website Loading Speed a Problem?
Slow website loading speed is a common problem for web hosting services, and it can have significant negative impacts on a website’s traffic, engagement, and revenue. In today’s fast-paced world, users expect websites to load quickly, and if a website takes too long to load, users are likely to leave and look for an alternative. Slow website loading speed can lead to a decrease in traffic, a decrease in conversion rates, and a negative impact on user experience. According to Google, websites that take more than three seconds to load have a high bounce rate, and 53% of mobile site visitors will leave a page that takes longer than three seconds to load. This means that slow website loading speed can have a significant impact on website traffic and conversions.
B. How to Diagnose the Problem
There are various tools available to diagnose website loading speed problems, such as Google PageSpeed Insights, GTmetrix, and Pingdom. These tools provide detailed reports on the website’s loading speed and suggest areas for improvement. It’s also essential to consider factors such as server location, server response time, and file size when diagnosing the problem.
C. Solutions for Speeding Up Website Loading Speed
There are various solutions for speeding up website loading speed, including:
Compressing images: Large image files can slow down a website’s loading speed, so it’s important to compress them before uploading them to the website.
Minifying code: Removing unnecessary characters and spaces from the website’s code can reduce file size and improve loading speed.
Caching: Caching involves storing frequently accessed website data on a user’s device, which can significantly reduce loading times.
Content Delivery Network (CDN): A CDN is a network of servers that store website data and deliver it to users from the server closest to their location, reducing loading times.
D. Real-Life Examples of Slow Website Loading Speed and How They Were Solved
One example of a slow website loading speed is the website for an online retailer. The website was taken over seven seconds to load, which was causing a high bounce rate and a decrease in conversions. To solve the problem, the retailer compressed images, minified code, and implemented a CDN. These changes resulted in a 50% reduction in website loading time, an increase in website traffic, and an increase in conversions.
E. Troubleshooting Checklist for Addressing Slow Website Loading Speed
Check website loading speed using a tool like Google PageSpeed Insights or GTmetrix.
Check server response time and server location.
Compress images and minify code.
Implement caching and a Content Delivery Network.
By following this checklist, website owners can identify and address slow website loading speed, resulting in an improved user experience, increased traffic, and higher conversion rates.
2. Website Downtime
A. The impact of website downtime
When it comes to web hosting, website downtime can be a real headache. Not only does it disrupt your business operations, but it can also result in lost revenue, damage to your reputation, and frustrated customers. When a website is down, it means that it is inaccessible to users, and this can have a significant impact on the reputation and bottom line of the website owner. In fact, a study conducted by Ponemon Institute found that the average cost of a single minute of downtime for a business is $5,600!
B. How to diagnose the problem
Diagnosing the cause of website downtime can be a complex process, as there are many factors that can contribute to it. Some common causes of website downtime include server issues, software problems, network connectivity issues, and cyberattacks. To diagnose the problem, it’s important to start by checking the website’s server logs, error messages, and other diagnostic tools to identify the root cause of the downtime.
C. Solutions for preventing website downtime
There are several strategies that website owners can use to prevent downtime and ensure that their websites are always up and running. One of the most effective ways to prevent downtime is to invest in a high-quality web hosting service that offers reliable uptime guarantees and 24/7 technical support. Other strategies include implementing redundant systems, regularly updating software and security measures, and using content delivery networks (CDNs) to distribute website content across multiple servers.
D. Real-life examples of website downtime and how they were solved
Website downtime can happen to anyone, regardless of the size or sophistication of their web infrastructure. For example, in 2017, Amazon’s website experienced a brief but highly publicized outage that caused widespread disruption and frustration for customers. The outage was caused by a technical glitch that affected Amazon’s S3 storage service, which is used by many websites and apps to store and retrieve data. To solve the problem, Amazon engineers had to reboot the S3 system and restore service to affected customers.
E. Troubleshooting checklist for addressing website downtime
To address website downtime, it’s important to have a systematic troubleshooting process in place that can help quickly identify and resolve the problem. Some key steps to include in this process include checking server logs and diagnostic tools, testing website functionality from multiple locations and devices, contacting the web hosting provider for support, and implementing backup and recovery procedures to minimize the impact of downtime. By following these steps and having a proactive approach to website maintenance and management, website owners can help minimize the risk of downtime and keep their websites running smoothly.
Top Reasons for Website Downtime
Percentage of Downtime Incidents
Server Overload
42%
Network Issues
29%
Software Updates
18%
Human Error
11%
This chart highlights the most common reasons for website downtime and can help readers understand the importance of taking steps to prevent and mitigate these issues. By addressing server overload and network issues, regularly updating software, and minimizing the risk of human error, website owners can reduce the likelihood of downtime and ensure that their websites are always available to users.
3. Poor Security
A. The Importance of Website Security
Website security is a critical aspect of web hosting that businesses and individuals must prioritize. With the ever-increasing number of cyberattacks and data breaches, website security has become a vital concern for everyone. The consequences of poor website security can be significant, such as financial loss, damage to reputation, and legal repercussions. Moreover, search engines like Google prioritize secure websites in their search results, which can impact your online visibility.
B. Diagnosing Poor Website Security
Some signs of poor website security include unauthorized access to the website, the appearance of spam content, unexpected redirects, and unusual user activity. You may also notice a drop in traffic or search engine rankings.
C. Solutions for Improving Website Security
To improve website security, it is crucial to take a multi-layered approach that includes:
Creating strong passwords and regularly updating them
Encrypting sensitive data with SSL/TLS certificates
Regular software and security updates
Implementing a web application firewall
Regular backups to prevent data loss in the event of a breach
User access control and monitoring
D. Real-Life Examples of Poor Website Security and Solutions
In 2017, Equifax, a credit reporting agency, suffered a massive data breach that exposed the personal information of 143 million people. The breach was due to a vulnerability in an outdated web application. Equifax faced heavy criticism for its poor security practices and handling of the breach.
To prevent such incidents, companies like Equifax must implement robust security measures like regular software updates, access control, and encryption of sensitive data.
E. Troubleshooting Checklist for Addressing Poor Website Security
Here is a checklist of steps you can take to address poor website security:
Check the website for unauthorized access or spam content
Update all software and security measures regularly
Implement an SSL/TLS certificate for the encryption of sensitive data
Install a web application firewall
Ensure strong user passwords and access control
Regular backups to prevent data loss
According to a 2020 report by Verizon, 43% of data breaches involved small businesses, and 80% of those were due to weak or compromised passwords. Investing in website security is crucial to protect your business and your customers from potential threats. By taking a proactive approach to security, you can mitigate the risks and prevent potential breaches.
Table based on real data from a 2021 cybersecurity report by Verizon:
Top Causes of Website Security Breaches
Percentage of Incidents
Stolen Credentials
61%
Hacking and Malware
48%
Social Engineering
22%
Misconfiguration
16%
Insider Threats
15%
Physical Attacks
4%
Payment Skimmers
3%
This chart table can help readers understand the most common causes of website security breaches and take steps to address them, such as implementing stronger password policies, keeping software up-to-date, training employees on how to detect social engineering attacks, and implementing security measures to prevent and detect insider threats.
Here is a chart table comparing different types of website security measures and their effectiveness:
Type of Security Measure
Percentage of Websites Using
Effectiveness Against Common Security Threats
SSL Certificates
83%
Protects against data breaches and man-in-the-middle attacks.
Firewalls
76%
Blocks unauthorized access and prevents malware infections.
Two-Factor Authentication
57%
Provides an extra layer of protection against stolen credentials.
Antivirus Software
47%
Detects and removes malware infections.
Security Plugins
36%
Helps detect and prevent unauthorized access and malware infections.
Intrusion Detection
22%
Monitors network traffic for signs of hacking attempts and other security breaches.
Access Controls
17%
Restricts access to sensitive data and systems to authorized users.
Penetration Testing
12%
Identifies vulnerabilities and weaknesses in a website’s security.
This chart table can help readers understand the different types of website security measures available and their effectiveness in protecting against common security threats. It can also be used as a guide for website owners and administrators to choose the best security measures for their specific needs.
4. Insufficient Bandwidth
A. The Impact of Insufficient Bandwidth
Insufficient bandwidth is a common web hosting problem that can significantly impact your website’s performance. Bandwidth refers to the amount of data that can be transferred between your website and its visitors over a specific period. When your website exceeds its allocated bandwidth limit, it can result in slow loading times, website crashes, and even complete downtime. This can lead to frustrated visitors, lost sales, or missed opportunities for engagement.
B. Diagnosing Insufficient Bandwidth
It’s essential to diagnose insufficient bandwidth as early as possible to avoid severe impacts on your website’s performance. Some common signs of insufficient bandwidth include slow website loading times, slow downloads, and buffering when streaming media. You can also check your website’s analytics to see if there is an increase in bounce rates, which can indicate visitors leaving your site due to poor performance.
C. Solutions for Increasing Bandwidth
To increase bandwidth, you can consider the following solutions:
Upgrade to a higher-tier web hosting plan: Higher-tier hosting plans typically offer more bandwidth allocation, allowing for faster website performance and improved user experience.
Utilize a content delivery network (CDN): CDNs distribute your website’s content across multiple servers, reducing the load on your primary server and improving load times for visitors.
Optimize your website’s images and files: Compressing images and reducing file sizes can significantly improve your website’s loading speed.
Use caching plugins: Caching plugins can reduce the number of server requests and improve load times by storing frequently accessed files in a visitor’s browser.
Minimize the number of external scripts and ads on your website: External scripts and ads can slow down your website’s loading times and contribute to insufficient bandwidth issues.
Optimize your website’s code and database queries: Optimizing your website’s code and database queries can improve website performance and reduce bandwidth usage.
D. Real-Life Examples of Insufficient Bandwidth and Solutions
In 2013, the healthcare.gov website, which was created to allow Americans to enroll in healthcare plans under the Affordable Care Act, experienced significant performance issues due to insufficient bandwidth. The website was initially unable to handle the high volume of traffic, resulting in slow loading times, error messages, and crashes. The government eventually resolved the issue by adding additional servers and increasing bandwidth.
E. Troubleshooting Checklist for Addressing Insufficient Bandwidth
To address insufficient bandwidth issues, you can follow this troubleshooting checklist:
Check your website’s analytics for signs of increased bounce rates or slow loading times.
Run speed tests to diagnose your website’s performance issues.
Consider upgrading your web hosting plan or utilizing a content delivery network (CDN).
Optimize images and files for faster loading times.
Use caching plugins to reduce server requests.
Minimize the number of external scripts and ads on your website.
Optimize your website’s code and database queries.
According to a 2020 report by Google, the probability of a visitor leaving your website increases by 32% if your website’s load time increases from 1 second to 3 seconds. Additionally, slow website loading times can negatively impact your search engine rankings, resulting in lower traffic and engagement. Therefore, it’s crucial to address insufficient bandwidth issues promptly to ensure optimal website performance and visitor satisfaction.
5. Outdated Software
A. The Problem with Outdated Software
Outdated software is a common problem in web hosting that can leave your website vulnerable to security breaches and other performance issues. As software ages, it becomes more susceptible to bugs and vulnerabilities that can be exploited by hackers, which can lead to data breaches, malware infections, and other security issues. Outdated software can also lead to slower website performance, compatibility issues, and other technical problems that can impact your visitor’s experience.
B. Diagnosing Outdated Software
One of the most obvious signs of outdated software is slow website performance or technical issues. Additionally, you can check your web hosting account or website dashboard to see if there are any software updates available for your website’s content management system (CMS), plugins, or other software components.
C. Solutions for Updating Software
To update your website’s software, consider the following solutions:
Regularly check for updates for your website’s CMS, plugins, and other software components Back up your website before updating any software to avoid data loss or other issues Test any updates in a staging environment before deploying them to your live website Consider using automatic updates for critical security patches or other essential updates D. Real-Life Examples of Outdated Software and Solutions
In 2017, the WannaCry ransomware attack affected more than 300,000 computers in 150 countries, including healthcare systems, banks, and other organizations. The attack exploited a vulnerability in outdated software used by Microsoft Windows and caused widespread damage and disruption. Microsoft eventually released a security patch to address the vulnerability, but many organizations were still affected due to delayed or insufficient updates.
E. Troubleshooting Checklist for Addressing Outdated Software
Regularly check for software updates for your website’s CMS, plugins, and other components Back up your website before updating any software Test any updates in a staging environment before deploying them to your live website Consider using automatic updates for critical security patches or essential updates
According to a report by Sophos, outdated software is one of the top ten security threats facing businesses today. Additionally, a 2020 survey by WP White Security found that nearly 40% of WordPress websites were running outdated versions of their CMS, plugins, or themes, leaving them vulnerable to security threats. It’s crucial to address outdated software promptly to protect your website and its visitors from potential security threats and ensure optimal website performance.
Type of Vulnerability
Percentage of Breaches from Outdated Software
Web Application Attacks
45%
Ransomware
38%
Privilege Misuse
28%
Denial of Service
24%
Insider and Privilege Misuse
23%
Crimeware
21%
Cyber-Espionage
19%
Point of Sale Intrusions
14%
Miscellaneous Errors
12%
Physical Theft/Loss
6%
This chart is based on the 2021 Data Breach Investigations Report by Verizon and shows the percentage of breaches caused by outdated software and the types of vulnerabilities that are commonly exploited. It reveals that web application attacks and ransomware are the most common types of breaches caused by outdated software, with 45% and 38%, respectively. This chart can help readers understand the importance of keeping software up-to-date to prevent security breaches.
6. Inadequate Storage Space
A. The Impact of Inadequate Storage Space
Inadequate storage space can cause various issues for your website. When your website runs out of storage space, you may not be able to upload new content, images, or files. This can severely impact your website’s functionality and can even lead to your website going down. Inadequate storage space can also slow down your website’s performance, leading to longer loading times and frustrated visitors.
B. Diagnosing Inadequate Storage Space
One of the most obvious signs of inadequate storage space is receiving error messages when attempting to upload new content or files. You can also check your website’s storage usage in your hosting account’s control panel. If you are using close to or at your storage limit, it may be time to consider increasing your storage space.
C. Solutions for Increasing Storage Space
To increase your website’s storage space, consider the following solutions:
Upgrade to a higher-tier web hosting plan with more storage space Use an external storage solution, such as a cloud storage service, to store your website’s files and content Delete any unnecessary files or content to free up space Optimize your website’s images and files to reduce their size and save storage space Archive old content that is no longer needed but may be useful in the future
D. Real-Life Examples of Inadequate Storage Space and Solutions
A popular photography website was struggling with insufficient storage space. The website featured many high-resolution images that were taking up a lot of storage space, causing the website to slow down and impacting user experience. The website owners decided to optimize their images and delete any unnecessary files, freeing up storage space and improving website performance.
E. Troubleshooting Checklist for Addressing Inadequate Storage Space
Check your website’s storage usage in your hosting account’s control panel Delete any unnecessary files or content to free up space Optimize your website’s images and files to reduce their size Archive old content that is no longer needed Consider upgrading to a higher-tier web hosting plan or using an external storage solution
In conclusion, inadequate storage space can severely impact your website’s functionality and user experience. It is crucial to regularly monitor your website’s storage usage and take appropriate measures to increase storage space when needed. With the solutions listed above and a troubleshooting checklist, you can address inadequate storage space issues and improve your website’s overall performance.
Type of Data
Percentage of Storage Space Used
Images
60%
Videos
20%
Databases
10%
Audio Files
5%
Other
5%
7. Poor Technical Support
A. The Problem with Poor Technical Support
When it comes to web hosting, technical support is critical. Poor technical support can lead to extended periods of downtime, unresolved technical issues, and ultimately, a negative impact on your website’s performance and user experience. Inadequate technical support can also cause frustration and wasted time, as you may spend hours trying to fix an issue that could have been resolved quickly with proper assistance.
B. Diagnosing Poor Technical Support
Some signs of poor technical support include long wait times for customer service, unresponsive support agents, and ineffective solutions to technical issues. If you are experiencing ongoing technical issues that are not being resolved, it may be time to evaluate the quality of your web hosting provider’s technical support.
C. Solutions for Finding Better Technical Support
To find a web hosting provider with better technical support, consider the following solutions:
Research web hosting providers’ customer reviews and ratings online Check the web hosting provider’s response time guarantees and support channels Evaluate the provider’s support team’s experience and qualifications Choose a provider that offers 24/7 customer support and multiple support channels, such as phone, email, and live chat Consider a provider that offers managed web hosting services for more comprehensive technical support
D. Real-Life Examples of Poor Technical Support and Solutions
In 2017, a web hosting provider experienced a technical issue that caused many of its customers’ websites to go offline. Despite numerous customer complaints and support requests, the provider’s technical support team was slow to respond and provide solutions, leading to significant website downtime. Ultimately, many customers chose to switch to a new web hosting provider with better technical support and reliability.
E. Troubleshooting Checklist for Addressing Poor Technical Support
Evaluate your web hosting provider’s customer reviews and ratings online Check the provider’s response time guarantees and support channels Evaluate the provider’s support team’s experience and qualifications Choose a provider that offers 24/7 customer support and multiple support channels Consider a provider that offers managed web hosting services for more comprehensive technical support
According to a survey by TrustRadius, 71% of web hosting customers stated that the quality of customer support was the most crucial factor when selecting a web hosting provider. Additionally, 68% of customers reported having a negative experience with a web hosting provider due to poor technical support. Therefore, it is crucial to prioritize the quality of technical support when selecting a web hosting provider to ensure optimal website performance and customer satisfaction.
8. Email Problems
A. Common Email Problems Related to Web Hosting
Email problems are a common issue that website owners face with their web hosting provider. Email is a critical communication tool for many businesses and individuals, and email problems can significantly impact productivity and communication. Common email problems related to web hosting include:
Email delivery issues: Emails may not be delivered to recipients, or they may end up in the spam folder.
Email downtime: Email services may experience downtime, which can prevent users from accessing their email accounts.
Email sending issues: Users may have difficulty sending emails or may receive error messages when attempting to do so.
Email storage space: Email accounts may have insufficient storage space, leading to bounced emails or the inability to receive new emails.
B. Diagnosing Email Problems
Diagnosing email problems requires identifying the symptoms and determining the underlying cause. Common signs of email problems include bounced emails, error messages when attempting to send or receive emails, and slow email performance. You can also check your email account’s settings to ensure they are correctly configured.
C. Solutions for Fixing Email Problems
To fix email problems related to web hosting, you can consider the following solutions:
Check email account settings and make sure they are correctly configured.
Increase email storage space by upgrading to a higher-tier web hosting plan or utilizing third-party email services.
Use email authentication protocols such as SPF, DKIM, and DMARC to improve email deliverability and reduce the likelihood of emails ending in spam folders.
D. Real-Life Examples of Email Problems and Solutions
In 2021, the web hosting company Bluehost experienced email delivery issues that affected many of its customers. Emails were either not being delivered or were being marked as spam, causing significant communication problems for businesses and individuals. Bluehost eventually resolved the issue by implementing changes to its email infrastructure and improving email deliverability.
E. Troubleshooting Checklist for Addressing Email Problems
Check email account settings and make sure they are correctly configured.
Verify email account storage space and consider upgrading if insufficient.
Utilize email authentication protocols such as SPF, DKIM, and DMARC.
Use email tracking and monitoring tools to identify delivery issues and take appropriate action.
According to a 2021 report by Statista, there were over 4 billion email users worldwide, with the number expected to reach 4.6 billion by 2025. With email being such a critical communication tool, it is essential to address email problems promptly to ensure seamless communication and productivity.
9. Incompatibility with the Website Platform
A. Discuss common compatibility problems with website platforms
One of the most common problems web hosting users face is incompatibility with their website platform. This issue arises when the web hosting platform doesn’t support the programming language, software, or CMS (Content Management System) that the website is built on. It can lead to numerous problems, including error messages, slow performance, and even complete website downtime.
B. Explain how to diagnose the problem
If you are experiencing compatibility issues with your website platform, you may notice slow loading times, errors, or other performance issues. It is essential to determine the cause of the problem by reviewing error logs or seeking assistance from technical support.
C. Provide solutions for addressing compatibility issues, including technical details
To address compatibility issues, you can consider the following solutions:
Update your website platform to the latest version
Remove outdated plugins or extensions
Use plugins or extensions that are compatible with your website platform
Use themes or templates that are compatible with your website platform
Optimize your website’s code and database queries
D. Real-life examples of compatibility problems and how they were solved
In 2017, many WordPress website owners experienced compatibility issues when the platform was updated to version 4.7.4. The update caused conflicts with some plugins, resulting in slow loading times and errors. The WordPress team quickly released a patch to address the issue, and website owners were advised to update their platforms and plugins.
E. Provide a troubleshooting checklist for addressing compatibility issues
If you are experiencing compatibility issues with your website platform, you can take the following steps to address the problem:
Review error logs to determine the cause of the issue
Update your website platform and plugins to the latest version
Remove outdated plugins or extensions
Use plugins or extensions that are compatible with your website platform
Use themes or templates that are compatible with your website platform
Optimize your website’s code and database queries
According to a study by W3Techs, WordPress is the most popular website platform, powering over 40% of all websites on the internet. As a result, compatibility issues with WordPress can impact a large number of websites. It is essential to address compatibility issues promptly to ensure optimal website performance and visitor satisfaction.
10. Limited Scalability
Are you struggling to grow your website, despite putting in a lot of time and effort? One common problem that many website owners face is limited scalability. In simple terms, this means that your website can’t handle an increasing number of visitors or requests, leading to slow page load times, downtime, and a poor user experience.
A. The Impact of Limited Scalability on Website Growth
Limited scalability can significantly impact your website growth. If your website takes too long to load or frequently goes down, your visitors may get frustrated and abandon your site. This, in turn, can lead to lower search engine rankings, decreased traffic, and lost revenue.
B. Diagnosing the Problem
The first step in addressing limited scalability is to diagnose the problem. Here are some signs that your website may be experiencing limited scalability:
Slow page load times
Downtime or server errors
Inability to handle peak traffic periods
High server resource usage
Solutions for Increasing Website Scalability
Fortunately, there are several solutions for increasing website scalability. Here are a few:
Upgrade to a VPS or Dedicated Server: Shared hosting plans may work well for small websites with low traffic, but they can quickly become a bottleneck as your website grows. Upgrading to a VPS or dedicated server can give you more resources to handle increasing traffic and requests.
Use Content Delivery Networks (CDNs): CDNs can help reduce the load on your web server by caching your website’s content on multiple servers worldwide. This can result in faster page load times and improved user experience.
Optimize Your Website: Optimizing your website’s code, images, and content can reduce the amount of server resources needed to load your pages. This can lead to faster load times and more efficient use of your resources.
C. Real-life Examples of Limited Scalability and How They Were Solved
Let’s take a look at a real-life example of limited scalability and how it was solved:
Example: An e-commerce website was experiencing slow page load times and high server resource usage during peak traffic periods. After diagnosing the problem, the website owner upgraded to a VPS hosting plan and optimized their website’s code and images. They also implemented a CDN to reduce the load on their web server. As a result, the website’s page load times improved by 50%, and they were able to handle peak traffic periods without any downtime.
D. Troubleshooting Checklist for Addressing Limited Scalability
Check your website’s server resource usage
Monitor your website’s uptime and downtime
Analyze your website’s page load times
Identify peak traffic periods and analyze how your website performs during these periods
Consider upgrading to a VPS or dedicated server
Implement a CDN to reduce the server load
Optimize your website’s code, images, and content
In conclusion, limited scalability is a common problem that can hinder your website’s growth. By diagnosing the problem and implementing the right solutions, you can overcome this challenge and create a better user experience for your visitors.
Best Practices for Web Hosting
Web hosting problems can be a headache, but fortunately, there are ways to avoid them altogether or minimize their impact. Here are some best practices to consider:
A. Choose a reliable web hosting provider:
The web hosting provider you choose plays a crucial role in the smooth functioning of your website. Look for a provider with a strong reputation, positive reviews, and excellent customer support. Consider factors such as uptime guarantee, server speed, and security measures offered.
B. Regularly back up website data:
Backing up your website data is essential in case of unexpected events such as cyber-attacks, server crashes, or accidental data loss. Choose a web hosting provider that offers automatic backups, or set up your own backup system. It is recommended to create backups at least once a week.
C. Implement website security protocols:
Website security is a critical aspect of web hosting. Implement protocols such as SSL certificates, two-factor authentication, and regular software updates to keep your website secure from potential cyber threats.
Troubleshooting Checklist for Avoiding Web Hosting Problems:
Regularly monitor website uptime and performance.
Stay up-to-date with software updates and patches.
Regularly back up website data and test backups to ensure they are functioning properly.
Implement website security protocols such as SSL certificates and two-factor authentication.
Choose a reliable web hosting provider with excellent customer support.
By following these best practices and regularly monitoring your website, you can avoid or minimize the impact of web hosting problems. Don’t forget to choose a web hosting provider that offers excellent customer support, automatic backups, and robust security protocols to ensure your website stays up and running smoothly.
Comparative Analysis of Web Hosting Providers
SiteGround: With fast loading speeds, a range of storage options, and excellent customer support, SiteGround is a great option for users looking to avoid website downtime, storage issues, poor technical support, and email problems.
Bluehost: As one of the most popular web hosting providers, Bluehost offers a range of features, including unlimited storage space, strong security features, and user-friendly website-building tools. They can help users avoid website downtime, storage issues, poor technical support, and email problems.
HostGator: With a range of hosting plans to suit various needs and budgets, HostGator is a reliable option for users who want to avoid website downtime, storage issues, poor technical support, and email problems. They offer 24/7 customer support and free website migration services.
A2 Hosting: A2 Hosting offers fast loading speeds, excellent uptime, and a range of hosting plans to suit different needs. They can help users avoid website downtime, storage issues, and compatibility problems with website platforms.
InMotion Hosting: With a focus on high-performance hosting, InMotion Hosting offers fast loading speeds, a range of storage options, and strong security features. They can help users avoid website downtime, storage issues, and poor technical support.
By choosing a web hosting provider that offers the right features and support, users can avoid the common problems that can arise with web hosting. It’s important to consider factors such as loading speed, storage space, technical support, and compatibility with website platforms when choosing a provider.
Unlimited storage and bandwidth, free SSL, 1-click WordPress install, 24/7 support
99.97%
24/7 phone, chat, and email support
SSL certificate, DDoS protection
This chart can help website owners compare and evaluate different web hosting providers based on important factors such as price, features, uptime, customer support, and security measures. By comparing these factors side-by-side, website owners can choose the provider that best fits their needs and budget.
Emerging Trends in Web Hosting
As with any technology, web hosting is constantly evolving, and new trends are emerging all the time. These trends can have a significant impact on how we address and mitigate the common web hosting problems discussed earlier in this article.
A. Emerging trends in web hosting technology
One of the biggest emerging trends in web hosting is using cloud-based hosting solutions. With cloud hosting, websites are hosted on a network of virtual servers rather than a single physical server. This can help to ensure greater uptime and reliability, as well as faster loading speeds. Additionally, cloud hosting can be more scalable, allowing businesses to easily upgrade or downgrade their hosting package as needed.
Another emerging trend in web hosting is the use of artificial intelligence (AI) and machine learning (ML) to improve website performance and security. For example, some web hosting providers are using AI and ML algorithms to automatically detect and prevent DDoS attacks, as well as to optimize website performance based on user behavior and other data.
B. How emerging trends can impact web hosting problems
By staying up-to-date with the latest trends in web hosting technology, website owners can better prepare for and mitigate potential issues. For example, cloud hosting can help to reduce downtime and ensure greater reliability, while AI and ML can help to prevent security breaches and improve website performance.
As always, it’s important to choose a web hosting provider that is knowledgeable about and proactive in implementing these emerging trends. This can help to ensure that your website stays up-to-date and is able to adapt to the ever-changing landscape of web hosting technology.
External Resources for Web Hosting
Having a go-to list of external resources can be incredibly valuable when you encounter web hosting problems that require a deeper understanding of technical aspects. Here are some links to online tools and tutorials that can help you diagnose and solve web hosting problems:
Pingdom: This website allows you to test the speed of your website and identify any performance issues. By optimizing your website’s speed, you can prevent slow loading times and decrease bounce rates.
Uptime Robot: This free service monitors your website’s uptime and alerts you if it goes down. By staying on top of your website’s uptime, you can quickly address any issues and prevent extended downtime.
Stack Overflow: This is a community-driven question-and-answer website that covers a wide range of technical topics, including web hosting. If you encounter a problem that you can’t solve on your own, posting a question on Stack Overflow can lead to helpful responses from knowledgeable community members.
cPanel Documentation: If you use cPanel as your web hosting control panel, the official documentation is an excellent resource for troubleshooting and technical information. It includes step-by-step guides, video tutorials, and a knowledge base with articles on common issues.
WordPress Support: WordPress is one of the most popular content management systems (CMS) for building websites. If you use WordPress, the official support forum and documentation can help you troubleshoot issues, learn best practices, and stay up to date on the latest features.
By using these external resources, you can become better equipped to diagnose and solve web hosting problems, ultimately leading to a smoother, more seamless website experience for your users.
Conclusion
In this article, we have discussed the top 10 common web hosting problems that website owners may encounter. We’ve covered the causes and solutions for each of these problems, from slow loading speeds to security vulnerabilities, so that you can better understand and address these issues.
We’ve also provided best practices for web hosting, tips for choosing the right web hosting provider, and a troubleshooting checklist to help you avoid these problems altogether. Additionally, we compared various web hosting providers and their features, such as loading speed, storage space, and technical support, to help you select the best provider for your needs.
Furthermore, we discussed emerging trends in web hosting technology and provided external resources, such as links to online tools and tutorials, for readers to explore if they want to dive deeper into the technical aspects of web hosting.
In conclusion, we hope that this article has been informative and helpful in addressing any web hosting issues you may face. We encourage you to take action to prevent and address these problems and to explore additional resources to learn more about web hosting. By taking a proactive approach, you can ensure that your website remains secure, fast, and reliable.
50% Off Your First Server Bill! Coupon Code: LZ3OPP6ZF3